

How it Works
Contact Angle :
The Contact Angle (θ) is the angle that a small drop of liquid makes as it meets the surface or interface of another phase, usually a solid
Force Balance at the Contact Angle (θ) :
Young’s Equation: At Equilibrium, γsv = γsl + γlv cosθ
Where, γlv is for liquid in equilibrium with its own vapor, γsv is for solid in equilibrium with its own vapor of liquid and γsl is for solid-liquid interface in equilibrium.

Static Contact Angle:
Arbitrary measurement of contact angle after dispensing liquid drop which is standing on the surface and the three phase boundary is not moving on a solid surface, is generally known as static contact angle.
Dynamic Contact Angle:
When the three phase boundary is moving, time dependent measurement of static contact angle is known as dynamic contact angle. Dynamic contact angles are of two types and are referred as advancing and receding contact angles. Dynamic contact angles can be measured by using two different approaches; changing the volume of the droplet or by using tilting cradle.
Advancing Angle: Largest contact angle θa possible without increasing solid-liquid interfacial area by adding liquid to the drop dynamically.
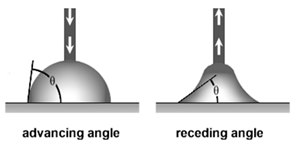
Receding Angle: If in above case you start removing volume then the smallest possible angle is called receding angle θr
Hysteresis angle: Hysteresis angle (θH) is the difference between Advancing Angle (θa) and Receding Angle (θr). θH = θa - θr

Tilting Plane Method: Tilting plane method gives both Advancing and Receding Contact Angles in same drop. The droplet is placed on the substrate which is then gradually tilted. The advancing angle is measured at the front of the droplet just before the droplet starts to move. The receding contact angle is measured at the back of the droplet, at same time point.
Brief Theories behind Contact Angle measurement
Generally, four methods are used for contact angle measurement in sessile drop.
1. Half Angle Fitting/ Height Width Method
2. Circle Fitting Method
3. Ellipse Fitting Method
4. Tangent Fitting Method
Half Angle Fitting/ Height Width Method :
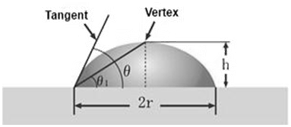
If droplet size is small then its shape can be assumed as a part of sphere and profile of drop in two dimensions is circle.
Here h is the height and r is the half of the width at baseline. So θ1 = tan-1h/r. And by simple geometry one can proof contact angle θ = 2θ1 (See adjacent figure). By calculating h and r by image analysis one can measure contact angle, θ.

This method is suitable for smaller size droplet with symmetrical shape. For larger size droplet gravity may reduce vertex height.
Circle Fitting:
Circle-fitting method calculates the contact angle as procedure described below:
Capture the drop image and save.
Detect the baseline.
Select 3 or more points at the edge of the curved drop profile.
Fit circle curve with this selected points and find the equation of circle.
Find the angle of tangent with the base line at the two points of intersection of this circle with baseline. This actually represents the contact angle.
Circle fitting method is the most widely used method for calculating the contact angle due to its high accuracy. It is especially applicable for calculation of contact angle with value less than 30°. This method has limitation for larger size drop and asymmetric drop.
Ellipse Fitting:
In ellipse fitting method ellipse curve fitting of the drop profile is used. Process is similar to that of circle fitting.
Capture the drop image and save.
Detect the baseline.
Here minimum 6 guess points are necessary on the edge of the curve for curve fitting.
Find the equation of the fitted ellipse.
Find the angle of tangent with the base line at the two points of intersection of this ellipse with baseline. This actually represents the contact angle.
The difference is that the algorithm of ellipse fitting is very complicated. It can be used to calculate contact angle based on sessile drop with very wide range value (0-130°)
Tangent Fitting:
The shape of the droplet is assumed to be part of the outline of an imaginary circle. This method obtains the center of the imaginary circle and determines the contact angle as the angle and straight lines tangent to the circle.

From the figure below the three arc points L1, L2 and L3 form the imaginary circle. The angle between the tangent line m and the drop baseline l is the left contact angle. The right contact angle can be measured the same way using points R1, R2, and R3.
Protocol: Contact Angle Measurements
1: Sample Preparation
Specimens with quality surfaces should be prepared in advance and their surfaces should be appropriately cleaned just before contact angle measurements. Should be placed perfectly horizontal. Thorough cleaning of the syringe and stainless steel needle is necessary. But it improves wetting of the steel by the liquids; as a result, the liquid (polar) released from the needle might have a tendency to climb up on the outside surface of the needle during the contact angle measurements. To eliminate this effect, liquid repellency must be enhanced for the needle tip by rubbing the needle tip in the Parafilm.
2: Securing Humidity/Vapour-level Conditions
The specimen should be placed in a measuring cell partially filled with a probing liquid and covered to institute saturation of phases. This should typically occur a few minutes before contact angle measurements are carried out. The syringe filled with the probing liquid should be installed at this stage, with the needle aligned above the specimen surface.
3: Measurement of Static Contact Angle
A small drop should be deployed onto the specimen surface with the needle located in the apex of the deposited drop. The diameter of the deposited drop (or its base) should be increased to at least 3–4 times diameter of the needle used (>5–7 mm) – the liquid supply should continue until clear spreading out of the drop base is observed. Needle should be detached from the drop, Wait for 1-3 min. to stabilize the drop and then measure the static contact angle.
4: Measurement of Advancing Contact Angle
The needle should be brought back to the deposited drop (or near above it) and more liquid should be added until drop base spreads out again. Detach the needle and immediately measure the advancing contact angle. Repeat this step 3-5 times and take the average.
5: Measurement of Receding Contact Angle
After advancing contact angle measurements are completed, the needle is immersed in the drop to withdraw the liquid and reduce the drop size. The drop base diameter should be observed during liquid withdrawal. The needle can be separated from the drop and the receding contact angle can be measured after the drop base diameter contracts during the liquid withdrawal. Repeat this step 3-5 times and take the average.
6: Reproducibility
The measurements of contact angles should typically be repeated on three to five different locations of the specimen or on different specimens that are of the same type and have undergone the same cleaning steps.
Concerns and considerations in contact angle measurements
Liquid penetrating the surface
Liquid dissolving the surface
Contamination of liquid
Size of drop and effect of gravity
Evaporation
Usually limited to ambient temperature
Usually limited to flat surfaces
Surface roughness
Surface heterogeneity
Surface group mobility and kinetics
Advancing vs. receding contact angles
Limited to relatively low energy solids (polymers)
Individual eyeball “bias”
Contact Angle Meters
Just Ask!
Please fill up the form to let us serve you better